BaseComponents
Introduction
BaseComponents aims to provide easily reusable and understandable components to increase productivity with UIKit. Formerly written in Objective-C and used extensively in production, the time has come to transition to Swift.
Components
Layout
ConditionalLayoutView
Adjust the order, size and selection of subviews based on traitCollections, userInterfaceIdiom, screen size or any other condition. The actual layout is performed by a SplitView instance.
First Steps
Use addConditionalLayoutView() on any UIView. To add conditional layout paths use addSubviews() and return true if a layout condition is met.
Code Sample
view.addConditionalLayoutView { (conditionalLayoutView) in
    let redView = UIView().color(.background, .red)
    let greenView = UIView().color(.background, .green)
    let blueView = UIView().color(.background, .blue)

    conditionalLayoutView.addSubviews({ (targetView) in
        targetView.addSubview(redView, layoutType: .equal)
        targetView.addSubview(greenView, layoutType: .equal)
        targetView.addSubview(blueView, layoutType: .equal)
    }) { (traitCollection) -> Bool in
        return traitCollection.horizontalSizeClass == .compact || traitCollection.horizontalSizeClass == .unspecified
    }

    conditionalLayoutView.addSubviews({ (targetView) in
        targetView.addSubview(greenView, layoutType: .percentage, value: 30, edgeInsets: .init(horizontal: 10))
        targetView.addSubview(redView, layoutType: .percentage, value: 70)
    }) { (traitCollection) -> Bool in
        return traitCollection.horizontalSizeClass == .regular
    }
}
ScrollingView
A subclass of UIScrollView to programatically layout subviews in a given direction. The size of a subview along a horizontal or vertical direction can be determined automatically, e.g. UILabel , or by providing a fixed point value.
First Steps
Use addScrollingView() on any UIView.
Code Sample
view.addScrollingView { (scrollingView) in
    let label = UILabel("Large Title").size(.largeTitle, .bold)
    scrollingView.addSubview(label, edgeInsets: .init(horizontal: 15))

    let contentView = UIView().color(.background, .red)
    scrollingView.addSubview(contentView, layoutType: .fixed, value: 500)

    let footerView = UIView().color(.background, .blue)
    scrollingView.addSubview(footerView, layoutType: .fixed, value: 400)
}
SplitView
Divide the available width or height of a UIView amongst its subviews programmatically.
First Steps
Use addSplitView() on any UIView.
Code Sample
view.addSplitView { (splitView) in
    splitView.direction = .vertical

    splitView.addSubview(UIView().color(.background, .red), layoutType: .equal)
    splitView.addSubview(UIView().color(.background, .blue), layoutType: .equal)
    splitView.addSubview(UIView().color(.background, .green), layoutType: .fixed, value: 44)
}
Storage
DiskData
Store and retrieve Codable objects, images, strings or data on the local file system. Has the ability to compress directories into a .zip archive.
First Steps
Create an instance of File or Directory. Use save() to store data.
Code Sample
let file = File(name: "helloWorld.txt")
file.save("Hello World!")
if let content = file.read(as: String.self) {
    print("File read", content)
}
file.delete()
CloudKitData
Store and retrieve objects conforming to CloudKitDataCodable in CloudKit.
First Steps
Create a class conforming to the CloudKitDataCodable protocol. Create an instance of CloudKitDataProvider to perform CRUD operations on objects. When first trying to query objects, attributes will have to be adjusted in the CloudKit Dashboard. Check the error parameter in the completionHandler for more information.
Code Sample
class Note: CloudKitDataCodable {
    var record: CloudKitRecord?
    func searchableKeywords() -> String? {
        return text
    }

    var text: String = ""
}

let dataProvider: CloudKitDataProvider = CloudKitDataProvider(.public)

let note = Note()
note.text = "Hello World"
dataProvider.save(note) { (storedNote, error) in
    if error != nil {
        print("Error storing note, try again?")
    }
    if let storedNote = storedNote {
        print("Note saved with id:", storedNote.record?.id)
    }
}
Networking
NetFetch
Create network requests that can be sent immediately or added to a queue. Convert a response into an object using bind().
First Steps
Create a NetFetchRequest and call fetch()
Code Sample
NetFetchRequest(urlString: "https://twitter.com/mmackh") { (response) in
    print(response.string())
}.fetch()
Dates & Time
TimeKeep
Adds conveniece methods to Swift's Date in order to calculate time spans, add or remove time units and get formatted strings.
First Steps
Create a Date and call remove() or add() to modify using time units. Use format() to retrieve a string.
Code Sample
let date = Date()
print(date.remove(.month(1)).dates(until: date))
print("In 7 seconds", date.add(.second(7)).format())

let past = date.remove(.year(5)).startOf(.month)
print(past.format(string: "EEEE, YYYY-MM-dd"))
UIKit Helpers
ControlClosures
Adds closures for actions and delegates to UIControl, UIGestureRecognizer, UIBarButtonItem, UITextField, UISearchBar, etc.
First Steps
Create a UIButton and addAction for the desired control event.
Code Sample
let button = UIButton(title: "Tap me!", type: .system)
button.addAction(for: .touchUpInside) { (button) in
    print("Hello World!")
}
Conveniences
Chainable properties for popular UIKit methods. Populate an UIImageView with remote images. Introduces many other conveniences.
Code Sample
let label = UILabel("Hello World!")
    .size(.largeTitle, .bold)
    .color(.text, .blue)
    .color(.background, .white)
    .align(.center)
Geometry
Adds shortcuts to UIView, CGRect & UIEdgeInsets for manually managing frames.
Code Sample
let label = UILabel("Hello World!")
label.x = 10
label.y = 10
label.width = 200
label.height = 300

let view = UIView().width(50).height(50)
DataRender
Avoid writing boilerplate and common pitfalls when displaying data in a UITableView or UICollectionView. Supports fast and accurate automatic cell sizing with ScrollingView.
First Steps
Create a UITableViewCell or UICollectionView subclass and overwrite bindObject(). Create an instance of DataRenderConfiguration and use it to init DataRender. Finally call renderArray().
Automatic Height for UITableViewCell
- Implement
itemAutomaticRowHeightCacheKeyHandler()on yourDataRenderinstance - Add a
ScrollingViewas the first subview of the cell'scontentView, i.e.contentView.addScrollingView(). - To accurately measure the required height,
safeAreaInsetsandlayoutMarginsfor every object in advance, an invisible childUITableViewis added the providedUITableViewCellsubclass. To recalculate a height based on new information or user actionrecalculateAutomaticHeight()
Code Sample
class Cell: UITableViewCell {
    override func bindObject(_ obj: AnyObject) {
        textLabel?.text = obj as? String
    }
}

lazy var dataRender: DataRender = {
    let config = DataRenderConfiguration(cellClass: Cell.self)
    let render = DataRender(configuration: config)
    render.adjustInsets = true
    render.onSelect { (itemRenderProperties) in
        print("Tapped:",itemRenderProperties.object)
    }
    view.addSubview(render)
    return render
}()

override func viewDidLoad() {
    super.viewDidLoad()

    dataRender.renderArray(["Hello","World"])
}
KeyboardManager
Repositions and resizes a SplitView instance to avoid overlapping issues caused by the keyboard.
Code Sample
KeyboardManager.manage(rootView: view, resizableChildSplitView: splitView)DebugController
Test ViewControllers by implementing `register` once and calling `open()` on `DebugController`. To quickly jump to a registered ViewController call `debugRegisteredViewController` in the completionHandler of `open()` - a shortcut that can be used when the app is launched.
Code Sample
DebugController.register(name: "ScrollingView") { (coordinator) in
    parentViewController.present(ScrollingViewController())
}

DebugController.open(completionHandler: nil)
UIKit Reimplementations
PerformLabel
A faster label useful for auto sizing cells. Animates smoothly by streching. Even though a `numberOfLines` API is defined, the current implementation will disregard this setting.
Code Sample
lazy var contentLabel: PerformLabel = {
    return PerformLabel()
        .align(.left)
        .color(.background, .black)
        .color(.text, .white)
        .size(.body)
}()
UI Components
CountdownPickerView
Display a countdown picker with seconds that is very close to the native iOS Timer app. All labels will be translated automatically depending on the phone's locale. A maximum width prevents this view from overflowing.
First Steps
Create a new CountdownPickerView instance and add it to a target view.
Code Sample
let datePicker = CountdownPickerView()
datePicker.isEndless = true
datePicker.countDownDuration = TimeInterval(3 * 60 * 60 + 2 * 60 + 1)
view.addSubview(datePicker)
NotificationView
Display a short message with an icon to inform about a success or error case. The message will dismiss itself after a certain duration or with a swipe.
Important Notes
Only show short messages. A message with a required width less than the width of the superview's frame will only take up the minimum required space.
Code Sample
NotificationView.show(.success, in: self.navigationController?.view, for: 2, message: "Document Uploaded")ProgressView
Able to display a progress spinner in different styles to indicate a loading state. Blocks interaction of the underlying UI when visible.
First Steps
Use the convenience method showProgressView() on any UIView to display a loading state.
Code Sample
view.showProgressView(true, type: .appleStyle)
DispatchQueue.main.asyncAfter(deadline: .now() + 5) {
    view.showProgressView(false)
}
SheetView
Display a customisable sheet similar to `UIAlertController.Style.actionSheet`, that is both more flexible and easier to use.
Structure
A SheetView instance can be constructed using components. A component provides a contentView and a given height (height can either be static or dynamic, use invalidateLayout() to recalculate). Premade SheetViewComponent include:
   - SheetViewPullTab: A pill view indicating that the sheet can be interactively dismissed
   - SheetViewNavigationBar: A simple compact `UINavigationBar` replica
   - SheetViewButton: A button module that highlights and acts like an UIAlertController button
   - SheetViewSeparator: A hairline divider used to separate components
   - SheetViewSpace: Divides components into sections
   - SheetViewCustomView: A base class to use for adding custom UI to SheetView
Each section (divided by SheetViewSpace), has a background which can be styled using sectionBackgroundViewProvider(). To further style the sheet, use maximumWidth, adjustToSafeAreaInsets or horizontalInset. After components have been added and the sheet is styled, display it using show(in view: UIView?).
Code Sample
let sheetView = SheetView()
 sheetView.components = [
    SheetViewButton("Delete", configurationHandler: { (button) in
        button.color(.text, .red)
    }, onTap: nil),
    SheetViewSpace(),
    SheetViewButton("Cancel", onTap: nil),
 ]
 sheetView.show(in: self.view)
Common
DispatchQueue Extension
Reintroduces `dispatchOnce` with a twist. On subsequent an optional `else` closure can be called. Adds a conciser `asyncAfter` method.
Code Sample
DispatchQueue.main.once {
    print("Called only one time")
} else: {
    print("Called subsequently")
}

DispatchQueue.main.async(after: 1.0) {
    print("1s later")
}
String Extension
Adds file path conveniences to Swift's `String`.
Code Sample
"/Users/me/document.pdf".lastPathComponent
"/Users/me/document.pdf".pathExtension
NotificationCenter Extension
Receive a `Notification` by implementing `observe`, which either accepts a raw `String` or a `Notification.Name` object. If you don't capture self strongly, the closure will deregister itself when the parent object is released. Post a `Notification` by calling emit().
Code Sample
observe("hi") { (notification) in
    print("Hi observed")
}

emit("hi")
Reasoning
-
BaseComponents allows you to write efficient & understandable code in a short amount of time by abstracting the tedious stuff. Implementing data sources or delegates takes a lot of boilerplate and often there's no need. Closures provide us with the ability to mentally connect the component with an action and is therefore the preferred way of passing values async in this library.
-
BaseComponents is flexible, meaning that you don't always have to use the components that come with it. Everything is built on top of UIKit, so mix and match if the project requires it. Don't be afraid of using UITableView instead of DataRender if you need the flexibility of tweaking every single value.
-
BaseComponents is evolving. Like Swift, this library will evolve over time to account for new improvements in the language and to cover more features. Documentation will improve and so will the understanding of what is needed next. SwiftUI is on the horizon as the next big thing, but in the mean time, I'm sure that UIKit will stick around. Particularly due to stability and predictability across iOS versions.
Sample Code
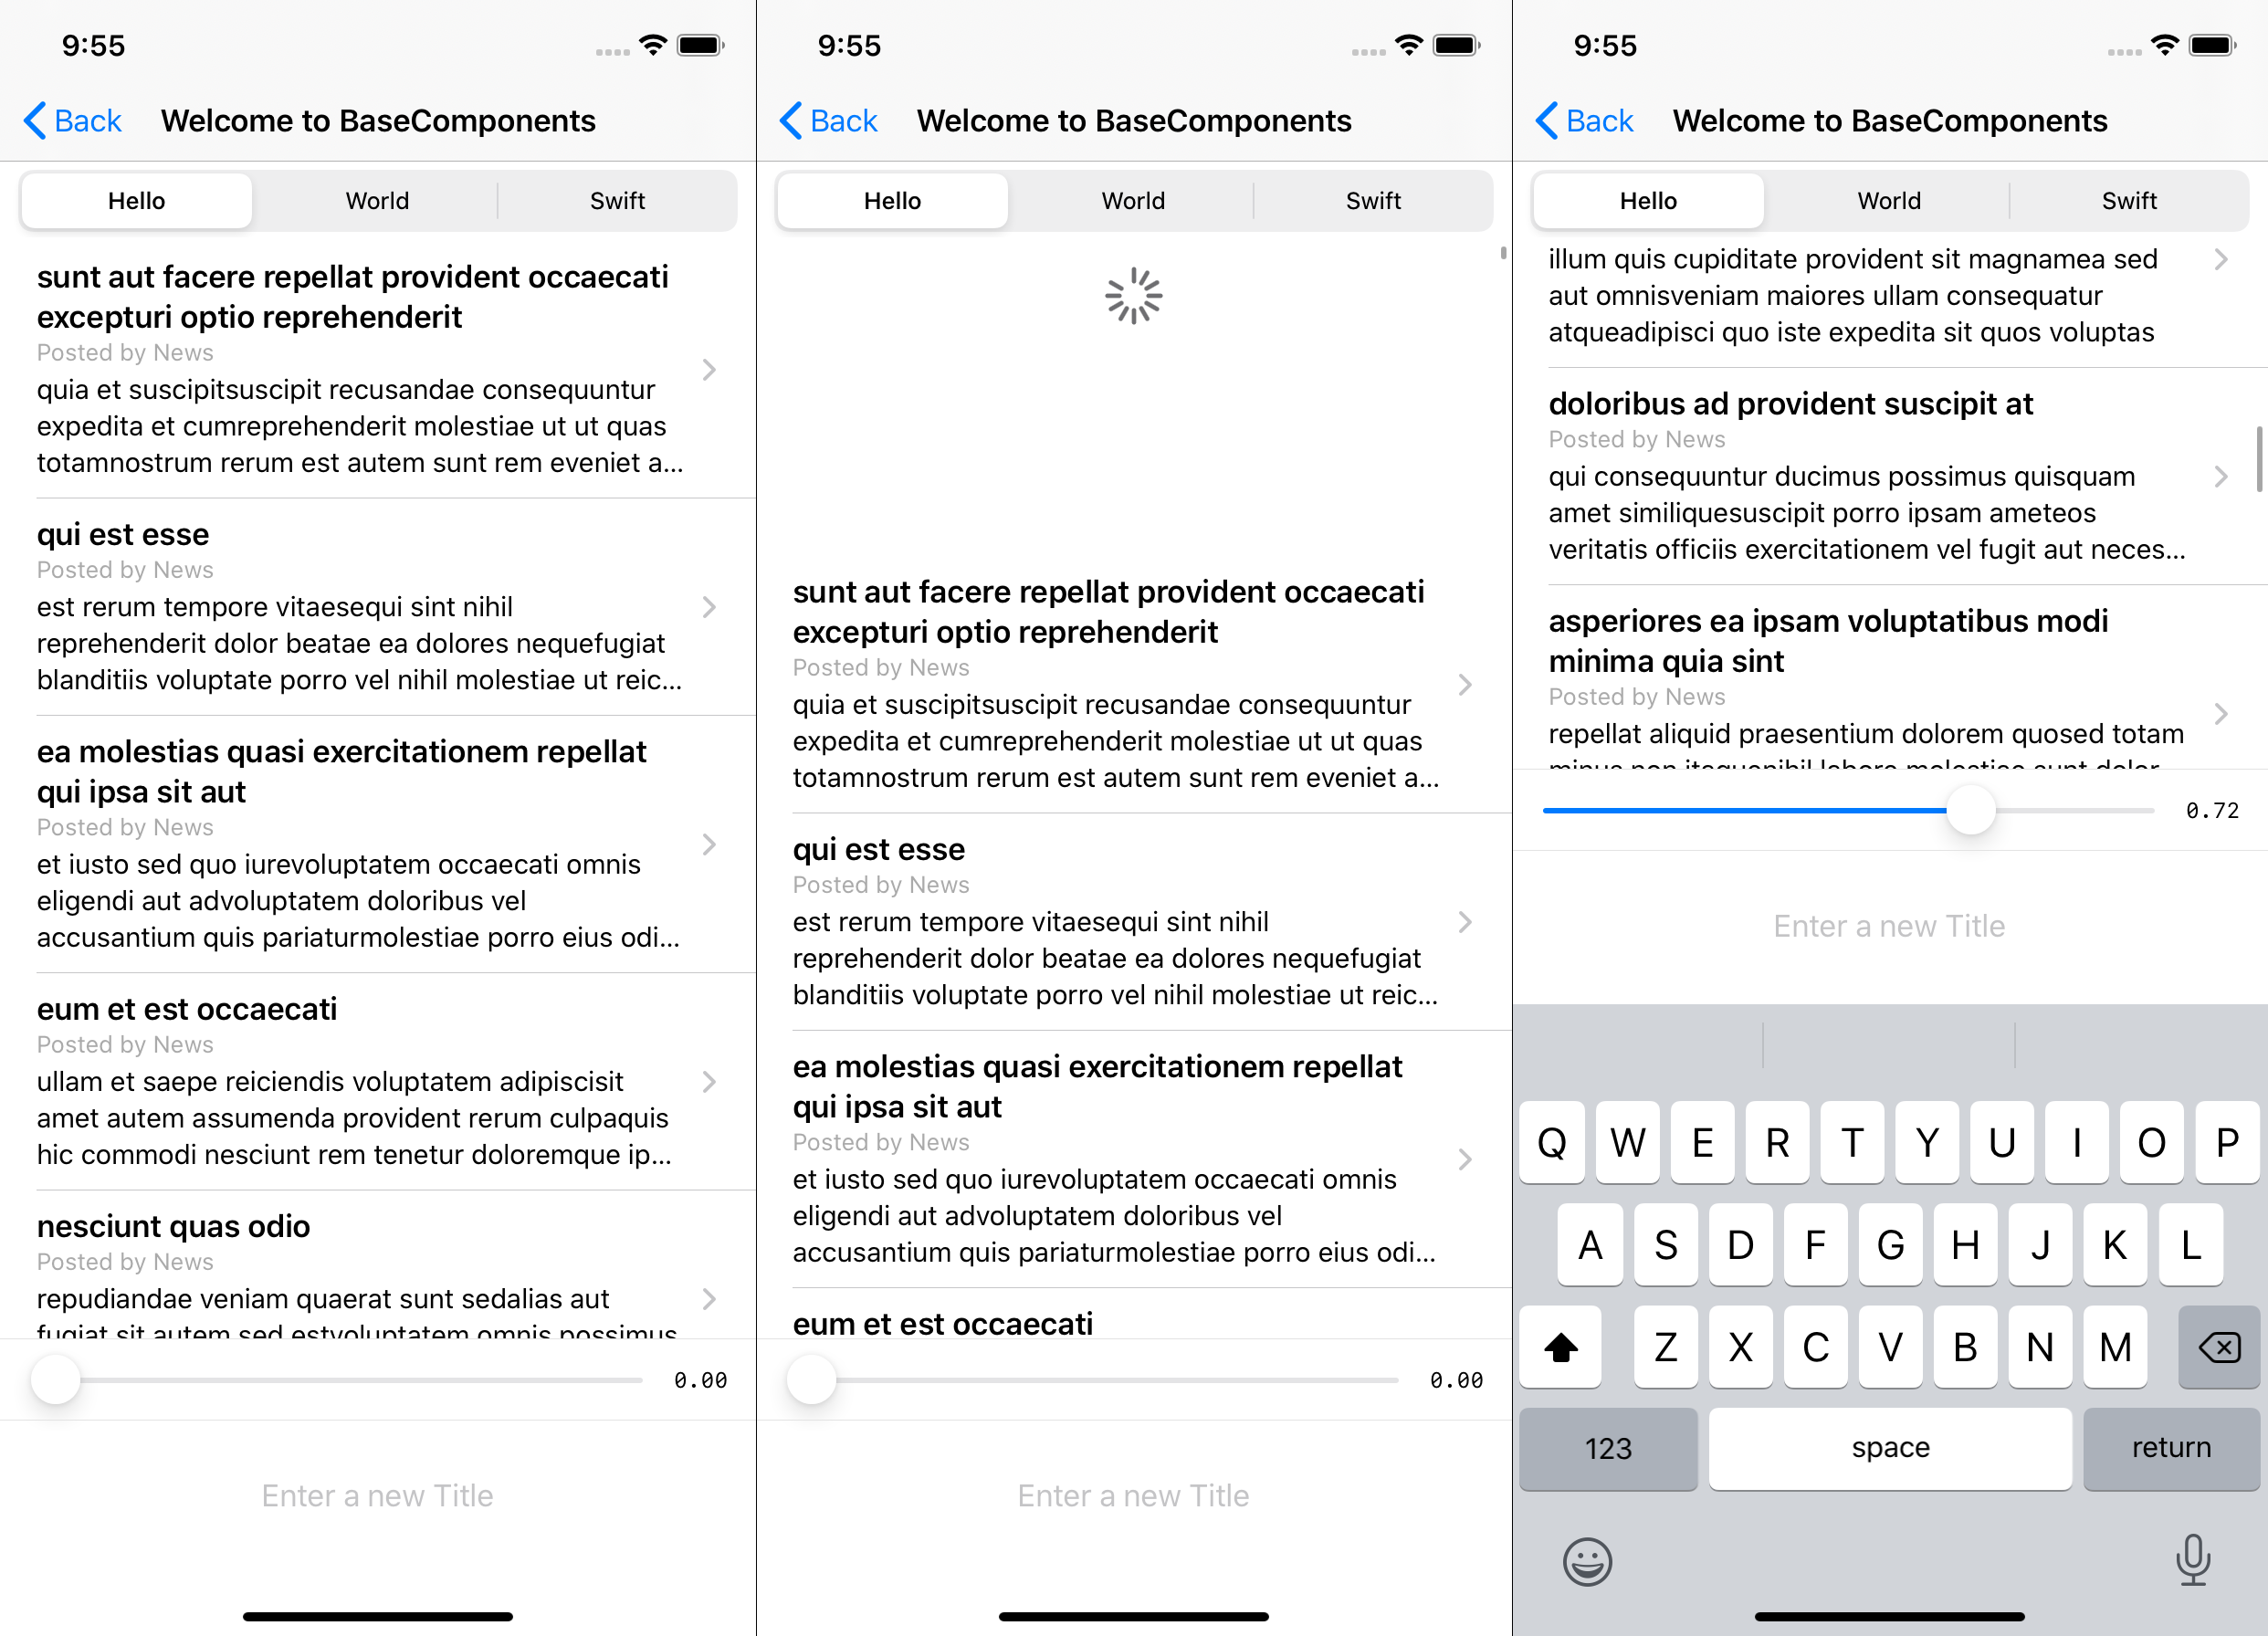
When looking at the sample code, we have a View Controller that supports:
- Dynamic Type
- Self-sizing cells
- Refresh control, reloading the data
- Layout fully in code
- Minimal state
- Easily understandable components
- Fetching JSON data and binding it to a model
- Responding to size of Keyboard
Check out the complete code for the screenshot here or others in the wiki.
Documentation
Documentation on the components is improving and pull requests are always welcome.