![]()


Still in alpha stage of development!
EasyNodeEditor is a library for creating node editors with SwiftUI. I am developing this library with the goal of showing as little internal complex code as possible, so that developers can concentrate as much as possible on node creation.
(v0.1.0)
(v0.1.4)

Create a class, and inherit it from NodeModelBase class.
class YourOutputNode: NodeModelBase {
}Create output variables.
Put @Output for output variables.
Make sure you put @objc wrapper to all your output variables.
There are no restrictions on the naming of the variables. Name the variables whatever you want, and the library will automatically use that name to display in the node.
class YourOutputNode: NodeModelBase {
    @objc @Output var output: Int = 3
}Register your node when you instanciate EasyNodeEditor View.
struct ContentView: View {
    var body: some View {
        EasyNodeEditor(nodeTypes: [YourOutputNode.self])
    }
}
This is it!
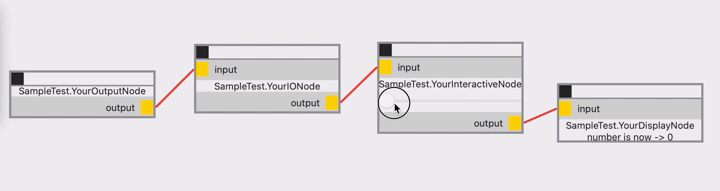
The EasyNodeEditor Library will create a node like this.
Create a class, and inherit it from NodeModelBase class.
class YourIONode: NodeModelBase {
}Create inputs and/or outputs.
Put @Input for input variables, and @Output for output variables.
Make sure you put @objc wrapper to all your input and output variables.
There are no restrictions on the naming of the variables. Name the variables whatever you want, and the library will automatically use that name to display in the node.
class YourIONode: NodeModelBase {
    @objc @Input var input: Int = 0
    @objc @Output var output: Int = 0
}Override processOnChange() function, and define your process.
Don't change input value inside processOnChange(). It will start infinite loop.
class YourIONode: NodeModelBase {
    @objc @Input var input: Int = 0
    @objc @Output var output: Int = 0
    override func processOnChange() {
        output = input * 5
    }
}Register your node when you instanciate EasyNodeEditor View.
struct ContentView: View {
    var body: some View {
        EasyNodeEditor(nodeTypes: [YourOutputNode.self, YoutIONode.self])
    }
}
Very easy!!
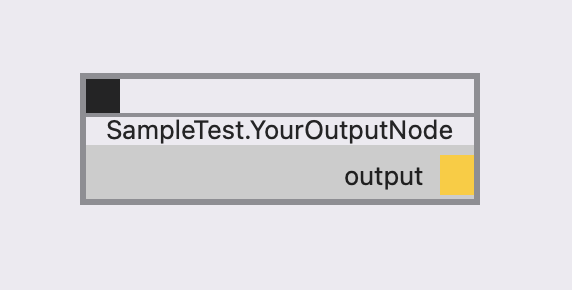
The EasyNodeEditor Library will create a node like this.
Create a class, and inherit it from NodeModelBase class.
class YourDisplayNode: NodeModelBase {
}Create inputs.
Put @Input for input variables.
Make sure you put @objc wrapper to all your input variables.
There are no restrictions on the naming of the variables. Name the variables whatever you want, and the library will automatically use that name to display in the node.
class YourDisplayNode: NodeModelBase {
    @objc @Input var input: Int = 0
}Override middleContent() function, and define your View.
class YourDisplayNode: NodeModelBase {
    @objc @Input var input: Int = 0
    override func middleContent() -> any View {
        Text("number is now -> \(input)")
    }
}Register your node when you instanciate EasyNodeEditor View.
struct ContentView: View {
    var body: some View {
        EasyNodeEditor(nodeTypes: [YourOutputNode.self, YoutIONode.self, YourDisplayNode.self])
    }
}
Amazing!!
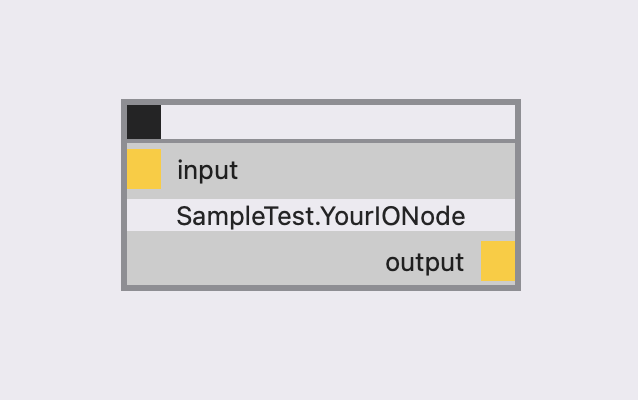
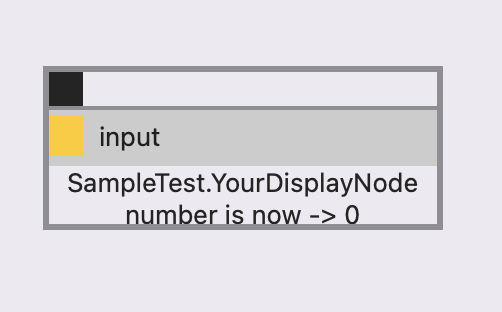
The EasyNodeEditor Library will create a node like this.
I assume you have read Usage 1 ~ 3 here.
For interactive nodes, EasyNodeEditor provides @Middle property wrapper.
Whenever the value of the variables with @Input or @Middle changes, processOnChange() function will fire.
If you need a binding object for interaction, use binding method and pass the KeyPath to get binding object.
After finished making, register your node as usual.
class YourInteractiveNode: NodeModelBase {
@objc @Input var input: Int = 0
@objc @Middle var count: Int = 0
@objc @Output var output: Int = 0
override func processOnChange() {
output = input * count
}
override func middleContent() -> any View {
Group {
Slider(value: binding(\YourInteractiveNode.count), in: 0...100)
}
.frame(minWidth: 200, maxWidth: 200)
.fixedSize()
}
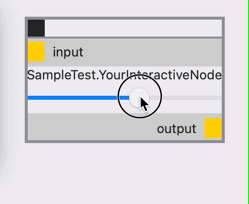
}Simple!!
The EasyNodeEditor Library will create a node like this.
import SwiftUI
import EasyNodeEditor

struct ContentView: View {
    var body: some View {
        EasyNodeEditor(nodeTypes: [YourOutputNode.self, YourIONode.self, YourDisplayNode.self, YourInteractiveNode.self])
    }
}

class YourOutputNode: NodeModelBase {
    @objc @Output var output: Int = 3
}

class YourIONode: NodeModelBase {
    @objc @Input var input: Int = 0
    @objc @Output var output: Int = 0
    override func processOnChange() {
        output = input * 5
    }
}

class YourDisplayNode: NodeModelBase {
    @objc @Input var input: Int = 0
    override func middleContent() -> any View {
        Text("number is now -> \(input)")
    }
}

class YourInteractiveNode: NodeModelBase {
    @objc @Input var input: Int = 0
    @objc @Middle var count: Int = 0
    @objc @Output var output: Int = 0
    override func processOnChange() {
        output = input * count
    }
    override func middleContent() -> any View {
        Group {
            Slider(value: binding(\YourInteractiveNode.count), in: 0...100)
        }
        .frame(minWidth: 200, maxWidth: 200)
        .fixedSize()
    }
}