A Swift library for the Nokia3310/5110 PCD8544 Monochrome LCD display
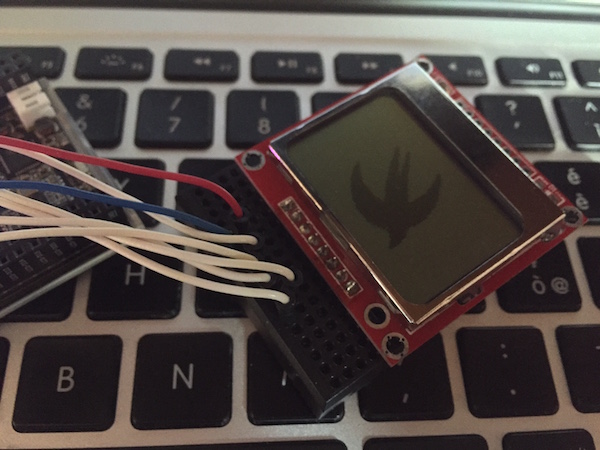
This library is an extended Swift port of the original PCD8544 C++ library from Limor Fried/Ladyada(Adafruit Industries). With this library you will be able to draw single pixels, display text(multiple fonts), monochrome images and transparent sprites on the Nokia 3110/5110 84x48 Monochrome LCD display.
The library need 5 GPIOs output to drive the display, two of those will act as software SPI (you don't need a hardware SPI to use this library, but if SwiftyGPIO support it for your board you can use it).
Every board supported by SwiftyGPIO: Raspberries, BeagleBones, C.H.I.P., etc...
To use this library, you'll need a Linux ARM board with Swift 3.x/4.x, the old Swift 2.x version of this library is available on a specific branch.
The example below will use a CHIP board but you can easily modify the example to use one the the other supported boards, full working demo projects for both the Chip and RaspberryPi2 (using the faster hardware SPI) are available in the Examples directory.
This example uses a C.H.I.P. board and its first 5 GPIOs connected as shown below, but you can easily change the board selected with GPIOs(for:) (e.g. .RaspberryPi2) and select a different set of GPIOs.
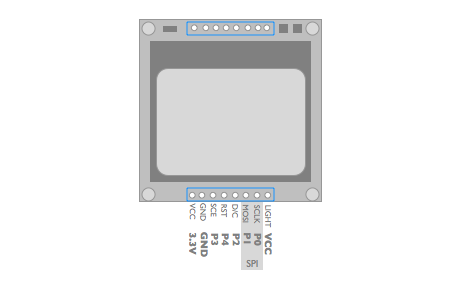
(It's highly likely that the pinout of your lcd module will be different from what is shown above, check your datasheet)
So, the first thing we need to do is configure the 7 GPIOs using SwiftyGPIO:
import SwiftyGPIO
import PCD8544

let gpios = SwiftyGPIO.GPIOs(for: .CHIP)
var sclk = gpios[.P0]!
var dnmosi = gpios[.P1]!
var dnmiso = gpios[.P5]!
var cs = gpios[.P6]!

var dc = gpios[.P2]!
var sce = gpios[.P3]!
var rst = gpios[.P4]!
Next, let's create a virtual SPI to send data to the display:
var spi = VirtualSPI(mosiGPIO: dnmosi, misoGPIO: dnmiso, clockGPIO: sclk, csGPIO: cs)Note that if your board has an hardware SPI and SwiftyGPIO supports it (i.e. every RaspberryPi board), you can create an instance of the hardware SPI object (at least one order of magnitude faster):
//The hardware SPI has MOSI in .P10 and SCLK in .P11
let spis = SwiftyGPIO.hardwareSPIs(for: .RaspberryPi2)
var spi = spis?[0]!
Then, create the display object we'll use to interact with the LCD:
var lcd = PCD8544(spi:spi,dc:dc,rst:rst,cs:sce)That's it, you are all set, let's see what we can do on the display:
lcd.setPixel(x:20,y:20,color:.BLACK)
lcd.setPixel(x:30,y:30,color:.BLACK)
lcd.setPixel(x:10,y:10,color:.WHITE)
lcd.display()
The setPixel function draw a single pixel at the given coordinates. .WHITE represents the transparent background, .BLACK and opaque pixel.
To update the display, always call .display() once you are done.
lcd.clearDisplay()To clean the display just call .clearDisplay().
To draw an image, using a bitmap buffer (create more monochrome bitmap images here):
lcd.draw(image:swift_logo,x:0,y:0,width:LCDWIDTH,height:LCDHEIGHT)
lcd.display()
The x and y parameters specify the position inside the 84x48 grid while the last two parameters are respectively the width and height og the image. The buffer is a buffer of UInt8, with size equals to width*height, buffer with an invalid size will be ignored.
If no additional parameters are specified images are opaque, i.e. white pixels will cover what's behind them, but if you need to draw a trasparent image (e.g. game sprites) add the transparent:true parameter.
Here we are displaying the Swift logo in front of a series of horizontal lines:
let alllines=[UInt8](repeating: 0xAA, count:LCDHEIGHT*LCDWIDTH/8)
lcd.draw(image:alllines,x:0,y:0,width:LCDWIDTH,height:LCDHEIGHT)
lcd.draw(image:swift_logo,x:0,y:0,width:LCDWIDTH,height:LCDHEIGHT,transparent:true)
lcd.display()This library allows to display strings using bitmap fonts. Two fonts are included: Tiny_Font and SinclairS (more font can be found or generated here).
To display some text, you need to load a font first and that font will be used for all the following strings:
lcd.loadFontAsDefault(font:SinclairS_Font,fontWidth:8,fontHeight:8)To draw a string simply call draw with some text and a position:
lcd.draw(text:"HelloWorld",x:0,y:0)
lcd.display()
That covers what the library can do.
To enable the SPI on the RasperryPi check out the SwiftyGPIO Wiki.
Examples are available in the Examples directory.
Please refer to the SwiftyGPIO readme for Swift installation instructions.
Once your board runs Swift, if your version support the Swift Package Manager, you can simply add this library as a dependency of your project and compile with swift build:
let package = Package(
    name: "MyProject",
    dependencies: [
	.Package(url: "https://github.com/uraimo/5110LCD_PCD8544.swift.git", majorVersion: 2),
	...
    ]
    ...
)
The directory Examples contains sample projects that uses SPM, compile it and run the sample with sudo ./.build/debug/Test5110.
If SPM is not supported, you'll need to manually download the library and its dependencies:
wget https://raw.githubusercontent.com/uraimo/5110lcd_pcd8544.swift/master/Sources/5110lcd_pcd8544.swift https://raw.githubusercontent.com/uraimo/5110lcd_pcd8544.swift/master/Sources/font.swift https://raw.githubusercontent.com/uraimo/SwiftyGPIO/master/Sources/SwiftyGPIO.swift https://raw.githubusercontent.com/uraimo/SwiftyGPIO/master/Sources/Presets.swift https://raw.githubusercontent.com/uraimo/SwiftyGPIO/master/Sources/SunXi.swift https://raw.githubusercontent.com/uraimo/SwiftyGPIO/master/Sources/SPI.swift
And once all the files have been downloaded, create an additional file that will contain the code of your application (e.g. main.swift). When your code is ready, compile it with:
swiftc *.swift
The compiler will create a main executable.
As everything interacting with GPIOs, if you are not already root, you will need to run that binary with sudo ./main.